Image Tracker
| Prerequisites |
|---|
| Target Manager |
| Recommended Conditions for Target Images |
| Tracker Coordinate System in Unity |
The Image Tracker recognizes and tracks planar images. It can demonstrate not only 3D objects but also videos, even the transparent one.
Make Image Tracker Scene
Set Target Image
Add / Replace Target Image
Start / Stop Tracker
Use Tracking Information
Change Tracking Mode
Definition
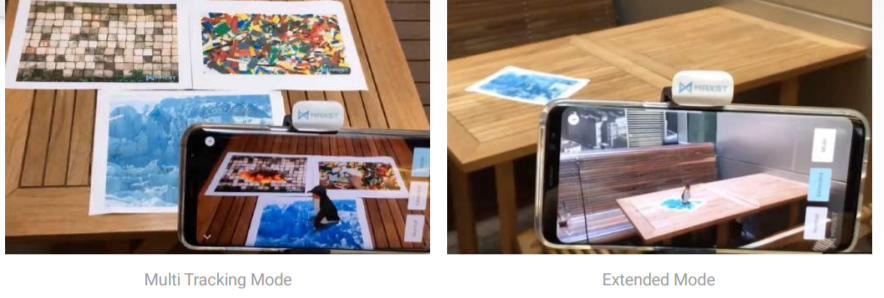
MAXST’s computer vision based 2D image tracking engine empowers your app to track image targets robustly even under challenging conditions like fast camera movement or partial covering of targets. In Extended Tracking Mode, the camera can track as far as it can see. Also, you can track up to 3 images at the same time in Multi Tracking Mode.
Make Image Tracker Scene
Create a new scene.
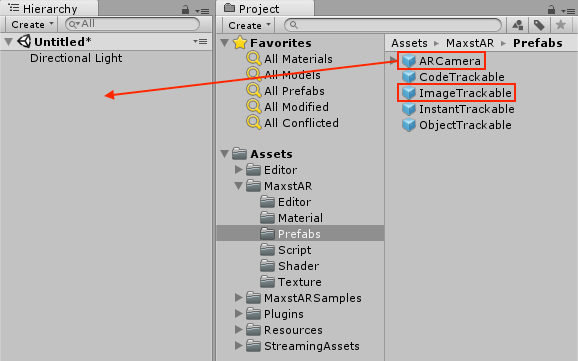
Delete the Main Camera that exists by default and add 'Assets > MaxstAR > Prefabs > ARCamera, ImageTrackable' to the scene.
※ If you build an application, you must add a License Key to ARCamera.
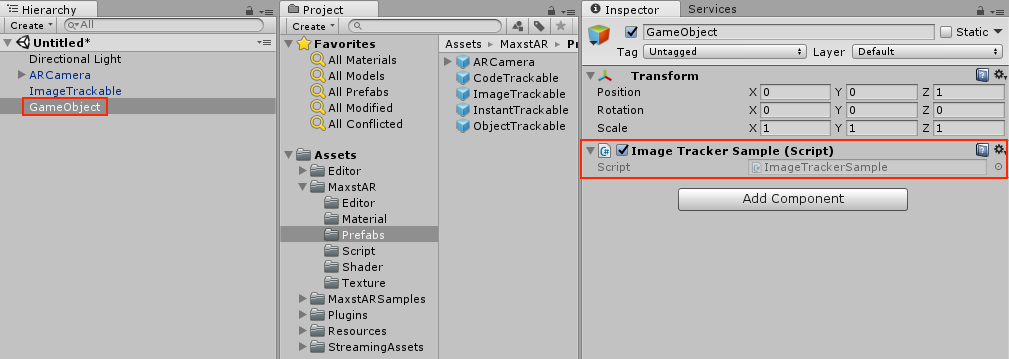
Create an empty object and add 'Assets > MaxstARSamples > Scripts > ImageTrackerSample' as a component.
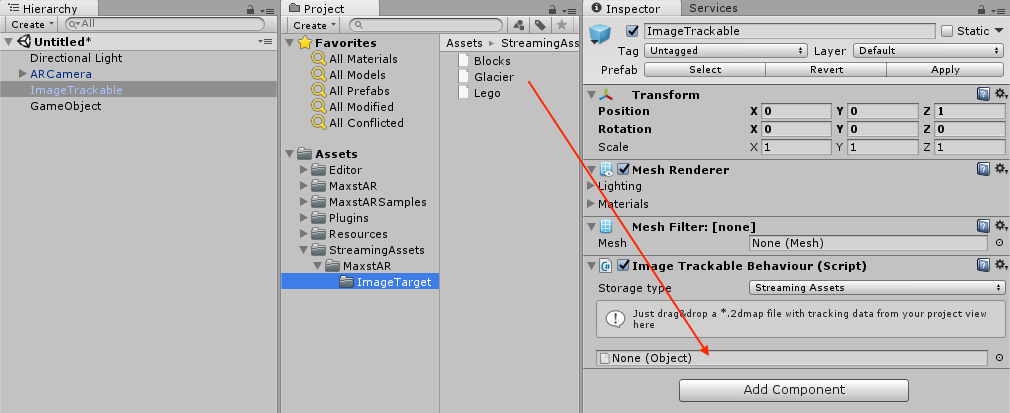
Drag a Assets > StreamingAssets > MaxstAR > ImageTarget > sample map file to the Inspector of ImageTrackable to set the map.
In the ImageTrackable's Inspector, drag and drop 'Assets > StreamingAssets > MaxstAR > Sample > Sample Map File'
Create a cube as a child of ImageTrakable and adjust its size and position.

Build and run the app. Then, point the camera at the target image to augment a cube.
※ You can download the target images from the Image Target link.
If you have a webcam connected, you can test it in the Unity Editor environment by pressing the Play button in Unity.
Set Target Image
By calling addTrackerData () to register the map file and calling loadTrackerData (), target image can be tracked. To set a target image, refer to the following code.
>ImageTrackerSample.cs
private void AddTrackerData()
{
    foreach (var trackable in imageTrackablesMap)
    {
        if (trackable.Value.TrackerDataFileName.Length == 0)
        {
            continue;
        }

        if (trackable.Value.StorageType == StorageType.AbsolutePath)
        {
            TrackerManager.GetInstance().AddTrackerData(trackable.Value.TrackerDataFileName);
        }
        else
        {
            if (Application.platform == RuntimePlatform.Android)
            {
                TrackerManager.GetInstance().AddTrackerData(trackable.Value.TrackerDataFileName, true);
            }
            else
            {
                TrackerManager.GetInstance().AddTrackerData(Application.streamingAssetsPath + "/" + trackable.Value.TrackerDataFileName);
            }
        }
    }

    TrackerManager.GetInstance().LoadTrackerData();
}
Train Target Image Instantly
If you want to use a raw image file as an image target without an offline training process via Target Manager, enter a JSON object as the first parameter of AddTrackerData().
A sample JSON format is like below.
{
    "image":"add_image",
    "image_path":"ImageTarget/Blocks.png",
    "image_width":0.26,
}
The "image":"add_image" pair should be located at first. The value of "image_path" is an image path and the value of "image_width" is a real width (meter unit) of an image target.
A sample code is like below.
TrackerManager.GetInstance().AddTrackerData("{\"image\":\"add_image\",\"image_path\":\"ImageTarget/Blocks.png\",\"image_width\":0.26}", true);
When copying to the assets folder, set the second parameter to true to indicate that it is a relative path and a file in the assets folder. If copying to external storage, enter the full path and set the second parameter to false.
The instant training permits only jpg and png formats. An image width as a pixel size should be more than 320 and the best is 640.
※ Instant training of an image takes twice as much time as loading a 2dmap.
※ You must call LoadTrackerData () after calling AddTrackerData ().
Set Target Image Package
If you are using multiple image maps, packaging them in a 2dpkg file will greatly improve map loading speed and recognition speed.
Create a 2dpkg with MapPackager, call AddTrackerData() to register the package file, and call LoadTrackerData() to track the target image.
>ImageTrackerSample.cs
private IEnumerator AddTrackerData()
{
    string packagePath = ... // The file must exist in the streaming asset.

    yield return new WaitForEndOfFrame();

    if (Application.platform == RuntimePlatform.Android)
    {
        List<string> fileList = new List<string>();
        yield return StartCoroutine(MaxstARUtil.ExtractAssets(packagePath, fileList));
        TrackerManager.GetInstance().AddTrackerData(fileList[0], false);
    }
    else
    {
        TrackerManager.GetInstance().AddTrackerData(Application.streamingAssetsPath + "/" + packagePath);
    }

    TrackerManager.GetInstance().LoadTrackerData();
}
※ Image Package(2dpkg) is available from AR SDK 6.1.0.
※ Only one 2dpkg can be added to Image Tracker.
Add / Replace Target Image
Create a map file refer to Target Manager.
Download the file you created.
Import the downloaded file.
Start / Stop Tracker
After loading the map, refer to the following code to start / stop the tracker.
>ImageTrackerSample.cs
void Start()
{
    ...
    TrackerManager.GetInstance().StartTracker(TrackerManager.TRACKER_TYPE_IMAGE);
    ...
}

void OnApplicationPause(bool pause)
{
    ...
    TrackerManager.GetInstance().StopTracker();
    ...
}

void OnDestroy()
{
    ...
    TrackerManager.GetInstance().StopTracker();
    TrackerManager.GetInstance().DestroyTracker();
}
Use Tracking Information
Refer to the following code to use the tracking information.
>ImageTrackerSample.cs
void Update()
{
    ...
    TrackingState state = TrackerManager.GetInstance().UpdateTrackingState();
    TrackingResult trackingResult = state.GetTrackingResult();

    for (int i = 0; i < trackingResult.GetCount(); i++)
    {
        Trackable trackable = trackingResult.GetTrackable(i);
        imageTrackablesMap[trackable.GetName()].OnTrackSuccess(trackable.GetId(), trackable.GetName(), trackable.GetPose());
    }
}
If you are not using ImageTrackable (ImageTrackableBehavior), you can replace OnTrackFail() with code that disables the renderer and collider, and OnTrackSuccess() with code that enables the renderer and collider and sets pose to the trackable's pose.
A sample code is like below.
>ImageTrackerSample.cs
void Update()
{
    foreach (var trackableGameObject in trackableGameObjects)
    {
        Renderer[] rendererComponents = trackableGameObject.GetComponentsInChildren<Renderer>(true);
        Collider[] colliderComponents = trackableGameObject.GetComponentsInChildren<Collider>(true);

        // Disable renderer
        foreach (Renderer component in rendererComponents)
        {
            component.enabled = false;
        }

        // Disable collider
        foreach (Collider component in colliderComponents)
        {
            component.enabled = false;
        }
    }

    TrackingState state = TrackerManager.GetInstance().UpdateTrackingState();
    TrackingResult trackingResult = state.GetTrackingResult();

    for (int i = 0; i < trackingResult.GetCount(); i++)
    {
        Trackable trackable = trackingResult.GetTrackable(i);
        string trackableName = trackable.GetName();

        GameObject trackableGameObject = ... // Get gameObject by trackableName

        Renderer[] rendererComponents = trackableGameObject.GetComponentsInChildren<Renderer>(true);
        Collider[] colliderComponents = trackableGameObject.GetComponentsInChildren<Collider>(true);

        // Enable renderers
        foreach (Renderer component in rendererComponents)
        {
            component.enabled = true;
        }

        // Enable colliders
        foreach (Collider component in colliderComponents)
        {
            component.enabled = true;
        }

        // set pose
        Matrix4x4 poseMatrix = trackable.GetPose();
        trackableGameObject.transform.position = MatrixUtils.PositionFromMatrix(poseMatrix);
        trackableGameObject.transform.rotation = MatrixUtils.QuaternionFromMatrix(poseMatrix);
    }
}
Change Tracking Mode
5 Tracking Modes of Image Tracker:
NORMAL_TRACKING, EXTENDED_TRACKING, MULTI_TRACKING, JITTER_REDUCTION_ACTIVATION, JITTER_REDUCTION_DEACTIVATION
- NORMAL_TRACKING: Default Setting. Traceable one target image.
TrackerManager.GetInstance().SetTrackingOption(TrackerManager.TrackingOption.NORMAL_TRACKING);
- EXTENDED_TRACKING: Extend and track the learned image in real time beyond the learned image. Even when the current camera frame does not have enough features of the target image, the surrounding environment can estimate the position of the target image.
TrackerManager.GetInstance().SetTrackingOption(TrackerManager.TrackingOption.EXTEND_TRACKING);
- MULTI_TRACKING: Possible to recognize and track up to three target images at the same time.
TrackerManager.GetInstance().SetTrackingOption(TrackerManager.TrackingOption.MULTI_TRACKING);
- JITTER_REDUCTION_ACTIVATION: Calibrate the JITTER using the Kalman filter. When moving the camera or target sharply, the movement of the augmented content may appear to have a slight delay.
TrackerManager.GetInstance().SetTrackingOption(TrackerManager.TrackingOption.JITTER_REDUCTION_ACTIVATION);
- JITTER_REDUCTION_DEACTIVATION: Disable the jitter reduction option.
TrackerManager.GetInstance().SetTrackingOption(TrackerManager.TrackingOption.JITTER_REDUCTION_DEACTIVATION);