Image Tracker for Smart Glasses
| Related documentations |
|---|
| Target Manager |
| Recommended Conditions for Target Images |
| Tracker Coordinate System |
The Image Tracker recognizes and tracks planar images on Smart Glasses. You can lay not only 3D objects but also videos(including transparent ones) on them.
Set up the Renderer for Smart Glasses
Start / Stop Tracker
Use Tracking Information
Set Target Image
Add / Replace Target Image
Train Target Image Instantly
Change Tracking Mode
Set up the Renderer for Smart Glasses
When you create an app for Smart Glasses, you must run the following initialization code.
@Override
private WearableDeviceController wearableDeviceController;
protected void onCreate(Bundle savedInstanceState) {
    ...
    wearableDeviceController = WearableDeviceController.createDeviceController(this);
    WearableDeviceRenderer imageTargetRenderer = new WearableDeviceRenderer(this, wearableDeviceController);
    WearableCalibration.getInstance().init(wearableDeviceController.getModelName());
    ...
}
To render segmented content in smart glasses, you must enter the surface size of the renderer correctly. The following code initializes the screen using the Surface size.
public void onSurfaceChanged(GL10 unused, int width, int height) {
    ...
    WearableCalibration.getInstance().setSurfaceSize(width, height);
    ...
}
The following code adds calibration information to the renderer.
private void renderFrame(TrackingState state) {
    ...
    float [] leftEyeProjectionMatrix = WearableCalibration.getInstance().getProjectionMatrix(0);
    float [] rightEyeProjectionMatrix = WearableCalibration.getInstance().getProjectionMatrix(1);
    float [] leftEyeViewport = WearableCalibration.getInstance().getViewport(0);
    float [] rightEyeViewport = WearableCalibration.getInstance().getViewport(1);
    ...
    GLES20.glViewport((int) leftEyeViewport[0], (int) leftEyeViewport[1], (int) leftEyeViewport[2], (int) leftEyeViewport[3]); // left eye
    ...
    leftContents.setProjectionMatrix(leftEyeProjectionMatrix);
    leftContents.setTransform(poseMatrix);
    ...
    GLES20.glViewport((int) rightEyeViewport[0], (int) rightEyeViewport[1], (int) rightEyeViewport[2], (int) rightEyeViewport[3]); // right eye
    ...
    rightContents.setProjectionMatrix(rightEyeProjectionMatrix );
    rightContents.setTransform(trackable.getPoseMatrix());
    ...
}
To check if the target device is supported by the MAXST AR SDK, call the following function.
wearableDeviceController.isSupportedWearableDevice()
If you have calibrated using the WearableCalibTool app, add the following code at initialization. The readActiveProfile function interacts with the active profile in the WearableCalibTool app and automatically reads the calibration information.
@Override
private WearableDeviceController wearableDeviceController;
protected void onCreate(Bundle savedInstanceState) {
    ...
    WearableCalibration.getInstance().readActiveProfile(MaxstAR.getApplicationContext(), wearableDeviceController.getModelName());
    ...
}
Calling the following function converts the screen mode of the smart glasses device supported by MAXST AR SDK.
@Override
protected void onResume() {
    ...
    wearableDeviceController.setStereoMode(true);
    ...
}

@Override
protected void onPause() {
    ...
    wearableDeviceController.setStereoMode(false);
    ...
}
Start / Stop Tracker
To start / stop Tracker after loading the map, refer to the following code.
>ImageTrackerActivity.java
@Override
protected void onResume() {
    ...
    TrackerManager.getInstance().startTracker(TrackerManager.TRACKER_TYPE_IMAGE);
    ...
}

@Override
protected void onPause() {
    ...
    TrackerManager.getInstance().stopTracker();
    ...
}
Use Tracking Information
In the folder where SDK is installed, go to 'assets > ImageTarget' folder, and there is sample target image. Print the image.
If you use the sample code, the following content will be augmented for each image.
- Blocks.jpg: The alpha video is augmented.
- Lego.jpg: The normal video is augmented.
- Glacier.jpg: The cube with the texture is augmented.
To apply tracking results to augmented objects, refer to the following code.
>ImageTrackerRenderer.java
public void onDrawFrame(GL10 unused) {
    ...
    TrackingState state = TrackerManager.GetInstance().UpdateTrackingState();
    TrackingResult trackingResult = state.GetTrackingResult();
    for (int i = 0; i < trackingResult.getCount(); i++) {
        Trackable trackable = trackingResult.getTrackable(i);
        if (trackable.getName().equals("Lego")) {
            ...
            videoQuad.draw();
        } else if (trackable.getName().equals("Blocks")) {
            ...
            chromaKeyVideoQuad.draw();
        } else if (trackable.getName().equals("Glacier")) {
            ...
            texturedCube.draw();
        } else {
            coloredCube.setProjectionMatrix(projectionMatrix);
            coloredCube.setTransform(trackable.getPoseMatrix());
            coloredCube.setScale(0.3f, 0.3f, 0.01f);
            coloredCube.draw();
        }
    }
    …
}
Precautions
- When learning image targets, width must be the actual size in m. (For example, if width is 27 cm, enter width as 0.27)
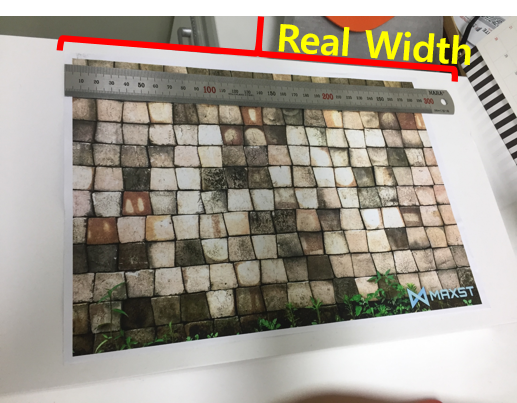
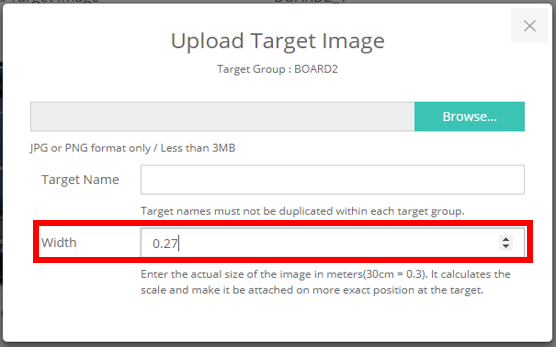
- The input size is used for Smart Glass Calibration. If you want to render the content the same size as the printed image target, you must enter the Transform Scale equal to the width you entered.
object.setScale(0.27f, 0.27f, 0.01f);
Set Target Image
By calling addTrackerData () to register the map file and calling loadTrackerData (), the target image can be tracked. To set a target image, refer to the following code.
>ImageTrackerActivity.java
onCreate() {
    ...
    TrackerManager.getInstance().addTrackerData("ImageTarget/Blocks.2dmap", true);
    TrackerManager.getInstance().addTrackerData("ImageTarget/Glacier.2dmap", true);
    TrackerManager.getInstance().addTrackerData("ImageTarget/Lego.2dmap", true);
    TrackerManager.getInstance().loadTrackerData();
    ...
}
Add / Replace Target Image
Create a map file refer to Documentation > Tools > Target Manager.
Download the file you created.
Unzip the downloaded file and copy it to the desired path. The way to copy maps to the assets folder and to the external storage is different.
- When copying to the assets folder, set the second parameter to true to indicate that it is a relative path and a file in the assets folder.
TrackerManager.getInstance().addTrackerData("ImageTarget/Blocks.2dmap", true);
- If copying to external storage, enter the full path and set the second parameter to false.
TrackerManager.getInstance().addTrackerData(mapFile.getAbsolutePath(), false);
※ You must call loadTrackerData () after calling addTrackerData ().
Train Target Image Instantly
If you want to use a raw image file as an image target without an offline training process via Target Manager, enter a JSON object as the first parameter of addTrackerData().
A sample JSON format is like below.
{
    "image":"add_image",
    "image_path":"ImageTarget/Blocks.png",
    "image_width":0.26,
}
The "image":"add_image" pair should be located at first. The value of "image_path" is an image path and the value of "image_width" is a real width (meter unit) of an image target.
A sample code is like below.
TrackerManager.getInstance().addTrackerData("{\"image\":\"add_image\",\"image_path\":\"ImageTarget/Blocks.png\",\"image_width\":0.26}", true);
When copying to the assets folder, set the second parameter to true to indicate that it is a relative path and a file in the assets folder. If copying to external storage, enter the full path and set the second parameter to false.
The instant training permits only jpg and png formats. An image width as a pixel size should be more than 320 and the best is 640.
※ Instant training of an image takes twice as much time as loading a 2dmap.
※ You must call loadTrackerData () after calling addTrackerData ().
Change Tracking Mode
5 Tracking Modes of Image Tracker:
NORMAL_TRACKING, EXTENDED_TRACKING, MULTI_TRACKING, JITTER_REDUCTION_ACTIVATION, JITTER_REDUCTION_DEACTIVATIO
- NORMAL_TRACKING: Default Setting. Traceable one target image.
TrackerManager.getInstance().setTrackingOption(TrackerManager.TrackingOption.NORMAL_TRACKING);
- EXTENDED_TRACKING: Traceable even at the far distance from the target image.
TrackerManager.getInstance().setTrackingOption(TrackerManager.TrackingOption.EXTENDED_TRACKING);
- MULTI_TRACKING: Possible to recognize and track up to three target images at the same time.
TrackerManager.getInstance().setTrackingOption(TrackerManager.TrackingOption.MULTI_TRACKING);
- JITTER_REDUCTION_ACTIVATION: Jitter reduction.
TrackerManager.getInstance().setTrackingOption(TrackerManager.TrackingOption.JITTER_REDUCTION_ACTIVATION);
- JITTER_REDUCTION_DEACTIVATION: Disable the jitter reduction option.
TrackerManager.getInstance().setTrackingOption(TrackerManager.TrackingOption.JITTER_REDUCTION_DEACTIVATION);